A brief overview of Stateless authentication in NodeJs (JWT Tokens:)

Backend Developer in Node.Js (exploring new tech )
What is JWT Authentication and Why to use JWT Authentication?
Before we begin let's understand what is a JWT.
So JWT, which stands for JSON Web Token, is an open standard for securely sharing JSON data between parties. The data is encoded and digitally signed, which ensures its authenticity.
JWT is widely used in API authentication and authorization workflows, as well as for data transfer between clients and servers.
Ohkkk.. now understand why to use it :-
First it is a stateless authentication
Hmm now what stateless mean (it simply means that it eliminates the need for the server to store session information for each client, and improved performance, as it reduces the overhead of session management.
However, it also requires careful implementation to ensure the security of the tokens and prevent unauthorized access.
How does it work ->

In authentication, when the user successfully logs in using their credentials, it returns a JSON Web Token.
And When the users want to access the protected route/private route, they have to send the JWT token typically in the Authorization header.
This works as a stateless authorization mechanism, where the server's protected routes will validate the JWT. If the JWT token is valid it sends the response to the client/user.
We'll understand it more in the next section by implementing this in the our Demo Project!
JWT Structure:

A JWT has three sections: a header, a payload, and a signature. Each sections are separated by periods. A typical JWT looks like this:
xxxxxx.yyyyyy.zzzzzz
Here the X’s represent the header, the Y’s represents the payload, and the Z’s represents the signature
An example token: eyJhbGciOiJIUzI1NiIsInR5cCI6IkpXVCJ9.eyJuYW1lIjoiQXJpbmRhbSIsImlhdCI6MTUxNjIzOTAyMn0._RETfYt1NardpwbQDm7z-t3Ri3ltOib8Vd6tCfyG5Nk
Header: It's a JSON object that contains information about the token, such as the algorithm used for the signature. The header is
Base64Urlencoded. Here’s an example:{ "alg": "HS256", "typ": "JWT" }Paylod: It's a JSON object containing the main data that we are trying to send, such as the user ID, permissions, and expiration time. The payload is also
Base64Urlencoded. Here’s an example{ "name": "Arindam", "iat": 1516239022 }Signature: It is used to verify the token’s authenticity. The signature is calculated using a secret key known only to the server, and it is typically a combination of the header and the payload, encoded with the algorithm specified in the header. Here’s an example of the signature:
HMAC256(base64UrlEncode(header) + "." + base64UrlEncode(payload), secret_key);
If you want to play with JWT and put these concepts into practice, you can use jwt.ioDebugger(this website will surely give you an idea for the specific working of all the three components of the JWT strucure) to decode, verify, and generate JWTs.
Project Setup:
1. Create Node.js Project:
To start our project, we need to set up a Node.js environment. So, let's create a node project. Run the Following command in the Terminal.
npm init
This will initialize a new Node.js project.
2. Install Dependencies:
Now, We'll install the required dependencies of our project.
npm install express mongoose jsonwebtoken dotenv
This will install the following packages:
express: a popular web framework for Node.js
mongoose: An ODM (Object Data Modeling) library for MongoDB.
jsonwebtoken: For generating and verifying JSON Web Tokens (JWT) for authentication.
dotenv: loads environment variables from a .env file
3. Setup Environment Variables:
Next, we'll create a .env folder to securely store our sensitive information such as API credentials.
//.env
MONGODB_URL=<Your MongoDB Connection String>
JWT_SECRET= "your_secret_key_here"
PORT=3000
4. Creating a MongoDB Database:
First to MongoDB Atlas and create an account or sign-in if you already have one.
Then we'll Get this Interface:
Simply Login and create your profile and then simply Create a new project new project button will be on top right of the screen
then Simlpy give a name to your Project

Add members ->

After making of the project simply click on the project->

Then create a cluster or the database where u want to store the data

Select the free one
As it is for a demo purpose only so we have consider the free one
One must consider the other 2 as for their need

Simply follow the required steps for it and simply create the one

Our cluster is now been created now its time to connect it with the Vs code we will simply click on the cluster and then click on the connect

Then simply click on to connect with vs code

Then just follow the commands given
5. Create Express Server:
Now, we'll create a index.js file in the root directory and set up a basic express server. See the following code.
const express = require("express");
const dotenv = require("dotenv");
const mongoose = require("mongoose");

dotenv.config();

const app = express();
const port = process.env.PORT;

//middleware provided by Express to parse incoming JSON requests.
app.use(express.json());

mongoose.connect(process.env.MONGODB_URL).then(() => {
  console.log("MongoDB is connected!");
});

app.get("/", (req, res) => {
  res.send("Hello World");
});

app.listen(port, () => {
  console.log(`Server running on port ${port}`);
});
Here, We're using the "dotenv" package to access the PORT number from the .env file.
At the top of the project, we're loading environment variables using dotenv.config() to make it accessible throughout the file.
6. Run Project:
In this step, we'll add a start script to the package.json file to easily run our project.
By using the command node index.js, we have to restart your server each time when you make changes to your file. To avoid this we can install nodemon using the following command.
COPY
COPY
npm install nodemon
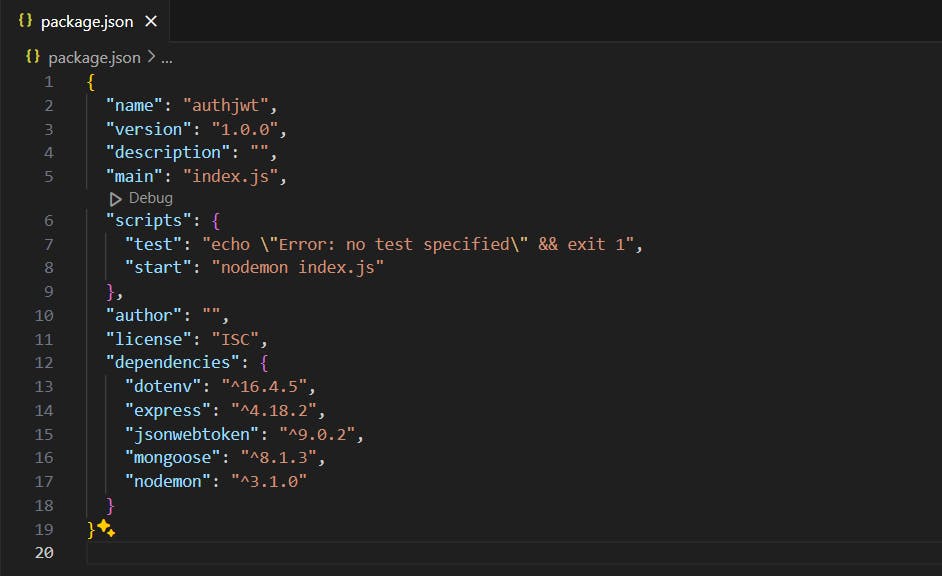
So, Add the following script to the package.json file.
COPY
COPY
"scripts": {
  "start": "nodemon index.js"
}
The package.json file should look like this:
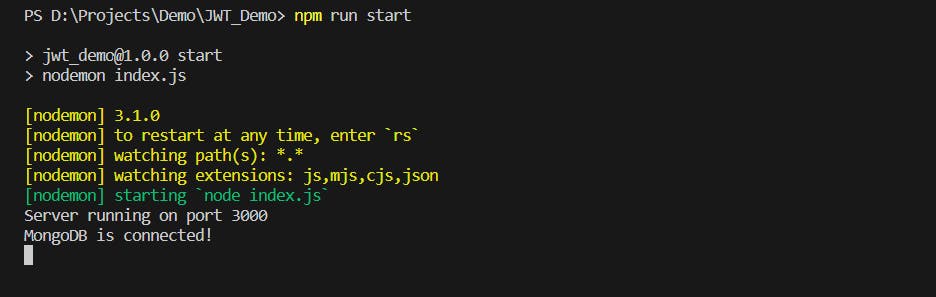
To check whether everything is working or not, let's run the project using the following command:
COPY
COPY
npm run start
This will start the Express server. Now if we go to this URL http://localhost:3000/ we'll get this:
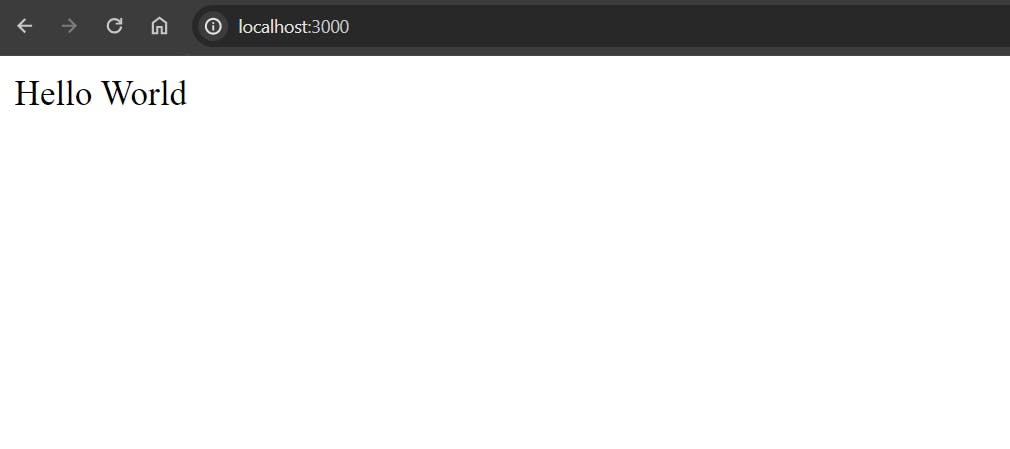
Awesome! The Project setup is done and it's working perfectly. Next up, we'll add Gemini to our project in the next section
Authentication with JWT:
1. Create User Model:
Till now we have done the basic project setup now we'll Create a new directory named “models” in our root directory and inside it, create a new file named User.js.
const mongoose = require("mongoose");

const userSchema = new mongoose.Schema({
  username: {
    type: String,
    required: true,
    unique: true,
  },
  password: {
    type: String,
    required: true,
  },
});

module.exports = mongoose.model("User", userSchema);
Here we have created a simple schema for our project.
2. Create Authentication Routes:
Next up, we'll create authentication Route for users to sign up and login.
const express = require("express");
const jwt = require("jsonwebtoken");
const User = require("../models/User");
const router = express.Router();

// Signup route
router.post("/signup", async (req, res) => {
  try {
    const { username, password } = req.body;
    const user = new User({ username, password });
    await user.save();
    res.status(201).json({ message: "New user registered successfully" });
  } catch (error) {
    res.status(500).json({ message: "Internal server error" });
  }
});

// Login route
router.post("/login", async (req, res) => {
  const { username, password } = req.body;
  try {
    const user = await User.findOne({ username });

    if (!user) {
      return res.status(401).json({ message: "Invalid username or password" });
    }
    if (user.password !== password) {
      return res.status(401).json({ message: 'Invalid username or password' });
    }
    // Generate JWT token
    const token = jwt.sign(
      { id: user._id, username: user.username },
      process.env.JWT_SECRET
    );
    res.json({ token });
  } catch (error) {
    res.status(500).json({ message: "Internal server error" });
  }
});

module.exports = router;
Here, the signup route allows users to register by providing a username and password. Upon receiving the data, it creates a new user instance and saves it to the database.
And, the login route verifies the user's credentials against the database. If the username and password match, it generates a JWT token and returns it to the client.
3. Add Middleware for JWT Verification:
Here we have added one middleware function verifyJWT that verifies the JWT token sent by the client and authenticate the user.
const jwt = require("jsonwebtoken");

function verifyJWT(req, res, next) {
  const token = req.headers["authorization"];
  if (!token) {
    return res.status(401).json({ message: "Access denied" });
  }

  jwt.verify(token, process.env.JWT_SECRET, (err, data) => {
    if (err) {
      return res.status(401).json({ message: "Failed to authenticate token" });
    }
    req.user = data;
    next();
  });
}

module.exports = verifyJWT;
4. Update index.js File:
Finally, We'll integrate these authentication routes with our Express application in the index.js file.
const express = require("express");
const dotenv = require("dotenv");
const mongoose = require("mongoose");
const userMiddleware  = require("./middleware/user");
const authRouter = require("./routes/auth");

dotenv.config();

const app = express();
const port = process.env.PORT;

//middleware provided by Express to parse incoming JSON requests.
app.use(express.json());

mongoose.connect(process.env.MONGODB_URL).then(() => {
  console.log("MongoDB is connected!");
});

app.use('/auth', authRouter);

app.get("/protected", userMiddleware, (req, res) => {
  const { username } = req.user;
  res.send(`This is a Protected Route. Welcome ${username}`);
});

app.get("/", (req, res) => {
  res.send("Hello World");
});

app.listen(port, () => {
  console.log(`Server running on port ${port}`);
});
Here We have created a /protected route which uses userMiddleware to checks if the user is authenticated.
If the user is authenticated , the server sends back a response saying "This is a Protected Route. Welcome [username]".
Here, [username] is replaced with the username of the authenticated user.
5. Testing the Endpoints:
Signup Endpoint:
To validate the SignUp Endpoint, we'll make a POST Request to this route http://localhost:3000/auth/signup with Headers Content-Type : application/json and the following JSON body:
{
    "username": "Arindam",
    "password": "071227"
}
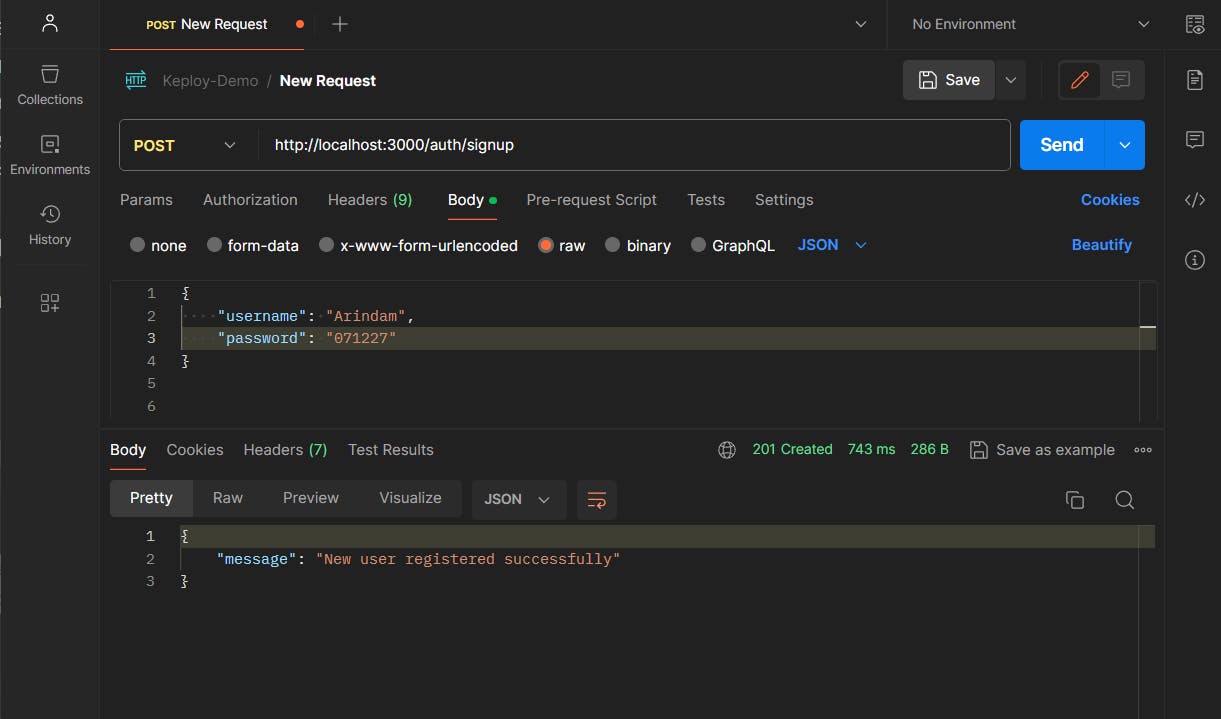
Awesome Our Signup Endpoint is working perfectly.
Log In Endpoint:
To validate the LogIn Endpoint, we'll make a POST Request to this route http://localhost:3000/auth/login with Headers Content-Type : application/json and the following JSON body:
{
    "username": "Arindam",
    "password": "071227"
}
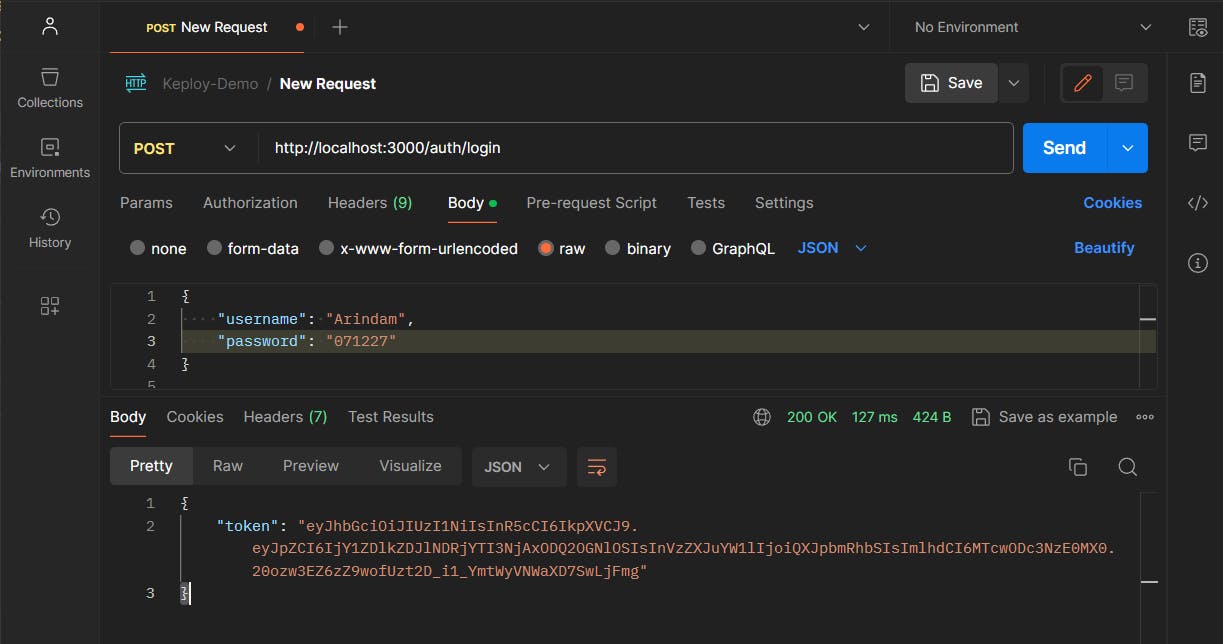
And It's working perfectly! We got the token back as a response. We will copy the token as we'll need this token in the next section.
Testing Protected Route with JWT Token:
Now that we have obtained a JWT token from the login endpoint, we will test the protected route by including this token in the request headers.
For that, We'll Make a GET request to the protected route URL http://localhost:3000/protected . And In the request headers,we'll include the JWT token obtained from the login endpoint:

Yay! It's Working Perfectly!!
We have successfully implemented JWT Authentication in NodeJS!
Now you can easily follow these step to authenticate your NodeJS application!
For More references You can check the following resources as well
Conclusion:
If you found this blog post helpful, please consider sharing it with others who might benefit. You can also follow me for more content on Javascript, Nodejs, and other web Development topics.


